Logical Volume Management (LVM) in Linux is a method to easily manage disk space. Suppose as an admin you have three disks: 60Gb, 50Gb and 40Gb and you want to allocate 80Gb and 70Gb of space to two users U1 and U2 respectively. Now, there is no single unit of either size available. This is where Logical Volume Management comes into play. We convert the physical disks into Physical Volumes (PV) of the same sizes, then cobine them to form one Volume Group (VG) (60+50+40=150Gb) and finally, break this VG into two Logical Volumes (LV) of 80Gb and 70Gb. LVM provides an abstraction layer and the user will see the entire allocated space as one whereas at the backend there might be multiple.
Look at the figure below to understand how logical volume management works.

Advantages of using LVM
- Easy to resize logical volumes
- Any file system can be installed on the LVs
- Easy to replace faulty disks
- Features like Snapshot and Thin-provisioning available
Important Terms
- Physical Devices – are the physical devices used to store data. They may be disk partitions, whole disks, RAID arrays or SAN disks. These are generally the /dev/sda, /dev/sdb etc.
- Physical Volume(PV) – Physical devices can not be used for LVM directly. They have to be converted into Physical Volumes(PVs). So, the first step is to convert the physical device into physical volume.
- Volume Group(VG) – are the storage pool made from one or more PV. VG is used to create Logical Volumes(LVs). It is not necessary to use the entire VG to create LVs
- Logical Volume(LV) – are created from the free physical extents in a volume group. Think of physical extent as the smallest unit of space for storing data (similar to a data block in the hard disk). LVs are collection of logical extents which are mapped to physical extents.
Example of Creating LVM Disk Storage
To show the process of creating a LVM, I am going to use three disk (sdc, sdd and see) that are already present in my system. If you don’t have free disk follow the link to add new disk into the system or you can also partition an existing disk.

Step1: Create PV
Use the pvcreate command to create physical volume for each disk.
#pvcreate /dev/sdc /dev/sdd /dev/sde
Check the list of all PVs in the system using the pvs command

The check the detail about any particular PV use the pvdisplay command.
#pvdisplay
or
#pvdisplay /dev/sdc
Step2: Create VG
Next, create volume group from one or more PVs using the vgcreate command
#vgcreate newVG /dev/sdc /dev/sdd /dev/sde
This command will create a volume group of size 15Gb from three PVs.
Alternatively, you can start creating from one or two PVs and then extend the VG
#vgcreate newVG /dev/sdc /dev/sdd
#vgextend newVG /dev/sde

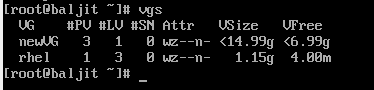
Note here that the size of the VG is not exactly 15Gb but slightly less. So your PV size should be slightly more than the required size of the VG. To view the details about the VGs use either the vgs or vgdisplay commands.
Step3: Create LV
lvcreate command is used to create a new logical volume from the space available in volume group
#lvcreate -n LV1 -L 8G newG
-n option specifies the name of the logical volume. -L option specifies the size of the logical volume.
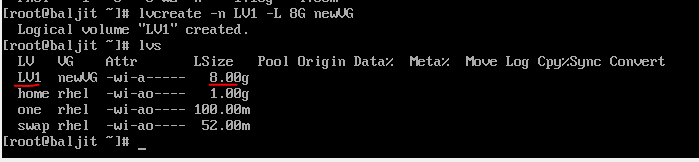
Just as above you can use the lvs or lvdisplay commands to check the details of LVs.
Now, if you check the details of the VG, newVG again you will see that 6.99Gb of space is left and not 7Gb because the VG created was slightly less than 15G. So, the next LV size can not be more than 6.99Gb.
Step4: Install File system
Once the LV is ready, the next step is to install any file system as per your choice using the mkfs command as below.
$mkfs.xfs /dev/newVG/LV1
Step5: Mount it persistently
Lastly, to access the LV i.e., to write/read data from it, we need to mount it to a mount point. So, first create a mount point
#mkdir /lvmount
and then edit the /etc/fstab file and add the following line
#vi /etc/fstab

/dev/newVG/LV1 /lvmount xfs defaults 0 0
Creating LV by specifying the size in terms of Extents
Remember Physical Extents were the smallest unit of storage for LV. Logical Volume Management in Linux can also is also possible by creating an LV by specifying the number of extents required. By default the size of each extent is 4Mb. Use the vgdisplay command to view the details of newVG. At the bottom you will see the entry specifying the PE size

Thus, to create a LV of 100Mb you have to use 25 extents. Alternatively, if you are asked to create a LV of 25 extents this means the LV size will be 100Mb. The option used is -l.
#lvcreate -n LV2 -l 25 newVG
The size of the PE (physical extent) can be changed while creating the Volume Group(VG) only. Suppose you are creating a VG named VG1 from PV named /dev/sdb and the PE size required is 8Mb.
#vgcreate -s 8M VG1 /dev/sdg
will create a VG with name VG1 where the PE size is 8Mb

Deleting Logical Volumes, Volume Groups and Physical Volumes
To delete Logical Volumes, Volume Groups and Physical Volumes we can use
lvremove – to delete logical volume
vgremove – to delete volume group
pvremove – to remove physical volume
#lvremove LV1
#vgremove newVG
#pvremove /dev/sdc
Note: It is not possible to delete the volume group if a logical volume using that volume group exists. Similarly, remove the volume group before deleting the physical volumes which combine to form the volume group.
Video Link
Practice Questions on Logical Volume Management
Q1. Create a logical volume newLV whose size is 6Gb from a volume group VG1 of size 8Gb.
Q2. Extend newLV to 7G from 6Gb.
Q3. Extend newLV from 7Gb to 9Gb.
Q4. Create a logical volume of 32 extents where each extent size is 8Mb